Monday, 29 June 2015

Techniques Pages- Multiple exposure

Multiple exposure can be done in a variety of ways. Some cameras have the ability to do it.

If your camera has the ability to carry out this technique the steps below explained how to procced with this technique. However it may variety from camera to camera.
  1. Ensure the camera is set to multiple exposure
  2. Make sure it is set to 'P' Exposure mode.
  3. Click onto the menu and go onto 'Shoot menu'
  4. Go down to image quality and select 'Raw'
  5. Take two desired photos which you would like to layer.
  6. Go onto the menu and go down to 'Retouch menu' then select 'Image overlay'
  7. Click onto image one and sleet your chosen image
  8. Repeat step 7 for the second image.
  9. Click on the preview and then select 'ok' and the image will be exposed.
  10. Upload to photoshop and make any further adjustments.
If the camera which you are using does not have this ability/ option to perform this function multiple exposure images can be created within photoshop, however this can be down in a variety of ways and can be difficult depending on the image and the way in which you with them to blend. A youtube tutorial would be best to use and using images which are similar to yours, however I will also explain  within a work diary how I created certain multiple exposures within Photoshop(This is linked below).

Image Bank- Multiple Exposure


I like how multiple exposure has been used here to enhance the size and detail of the London eye. This image shows how people use multiple exposure in a variety of ways to shows places or people in a more interesting manor. Tones are often used within multiple exposure to help create a dramatic effect and atmosphere within the piece. Tones also highlights certain messages displayed by the image. Below is a variety of some multiple exposure images which I found when researching the technquie. At the end of this post will be a link to a post which describes how multiple exposure could be carried out, however this is technique is often very complex to create depending on the images and ability of the camera. Most require extensive work in photoshop and not just the use of camera settings to create a incrediable image. For this reason it is hard to judge how each multiple exposure image was created.


I like the way in which this multiple exposure image still shows both images fully. A mixture of colours and patterns are used to help increase the appeal of this image and create a gentle but dramatic atmosphere. I way in which these image have been overlaid show both the girls background and the surround of the plants which are outside of the girls outline. This creates an interesting image compared to many other multiple exposure images which is intriguing to viewer.


I like how the texture on the hands has been created through this multiple exposure. Along with the gradual change and missing specs of the hand. I think this image suggests a loss or difficult letting go of a person or object.  Missing areas of the hand help to demonstrate an idea of fading away and enhance this image of loss. The positing of the hand also appears to be reaching out and makes people question where to or what for. Although this image is made of two simple photographs the join of this images have created a complex pieces which can be interitaed in various different ways 


Overall, although I only briefly looked at multiple exposure I am impressed with how it is used to display strong ideas in a more appealing way and makes people think and questions settings or scenes whilst wonder what the original image was like. I find this technique to display images which appear very complex and filled with interesting detail. Often multiple exposure involved an image showing a texture which is then placed over a model showing this texture through the models skin. This is shown a lot within the images elected below. I think this is an interesting way to include multiple formal elements within one image. Patterns, textures and bright colours help to build the multiple exposure image. I find this technique to be very inspiring and would be interesting to explore in further detail my creating my own multiple exposure images.  
One photographer which I found was Andre De Freitas, he is a photographer who I found to have worked on many multiple exposure images and I used a variety of his images as examples within this image bank. 

Linked blow is a short description of how multiple exposure images can be created. 

Sunday, 28 June 2015

Work Diary- Blurring

Plans and expectations

For this shoot I plan to experiment with my shutter speed to create a blur effect. I think this is an interesting way to show some movement. Below is a link to a post which explains how to carry out this technique.

Evaluations


I really like the surreal effect this technique gives the image. I think this technique has helped to show the movement of people. I like the blur used. This shoot was very fun to create, however difficult to create interesting images which worked.


Technique Page- Blurring

This particular technique is interesting ans shows movement and can help enhance certain aspects or area of an image.  Below explain how to carry out this technique through camera settings.
  1. Set the ISO onto the lowest number possible, normally 100
  2. Change the camera to 'S' setting 
  3. Change the shutter speed to around 1/8 to achieve the blur
  4. When shooting you can move the camera or subject you are shooting to create the blur within the image. 

Straight Images- Blurring


Contact Sheet- Blurring


Saturday, 27 June 2015

Work Diary- Multiple Flash


This is a very similar type of technique to slow sync which allows a photographer to display more then one of a person within one image. I think this is a very interesting technique and produced very surreal images.  How I created this image is shown within my technique page. This technique would be an interesting way to show peoples emotions and how they have two sides to their personality also helping to display some mental illness and how they hide it from the world however there is another side which we don't see. 


Technique Page- Multiple flash

This technique must be done in studio conditions (in the dark)
  1. Set up the studio how required, e.g. light boxes.
  2. Set the camera to manual exposure
  3. Set the exposure to 'BULB', this will keep the shutter open for as long as you press the button.
  4. Turn the lights onto a setting where they only turn one when you want them to and do not produce a constant flow of light.
  5. Get the subject to move and flash when you see fit, producing a multiple flash image(The way in which to produce a flash will be different depending on how these lights normally connect to a camera/ the type of lights)

Straight Images- Multiple Flash


Contact Sheet- Multiple Flash


Image Bank- Multiple Flash


The following images are created in a particular way through certain settings on a camera. Often in a studio environment due to this being more practical and creating a more accurate and successful image. This particular style can however be created or enhanced on a photo editing software.


I like the way in which this image shows a sequence of movement and shows the way in which she plays this instrument.
The movement of a dancer is often shown in multiple flash. I believe it is an interesting way to combined the dancer each individual step showing the complicate of her movements.
The image opposite reflects how multiple flash can allowing use to see two poses of a person. This also means we could see two facial expressions from a person creating a more interesting piece. I feel by using multiple flash in this way it creates two main focal points of the image and can often create a confusing but satisfying piece.

Wednesday, 24 June 2015

Straight Images- Multiple Imagery


Contact Sheet- Multiple Imagery


Image Bank- Multiple Imagery


Multiple imagery I shown by the joining of images to create a new image. the ways above show how a similar area , item in a different view or like the image of the lips shows something however in a different position joined together in a collage way to show the different angles and aspects of the item of which you would not see from just one single photo. I found Multiple imagery interesting to look at as it can be considered in two different ways. I way in which I wish to display multiple imagery is shown in the images above however there is many images showing have two photos have almost been placed on top of each other to create a unique and different image. My favorite image out the selected above is the first image of the lips. I like how the center is a simple and straight ahead view with flat lips and then as you look at the other images it shows the different angle at which you would turn to look at them almost. A similar idea has been used within the image of the clock where they have the main focus of the item , the owl detail, is central. 

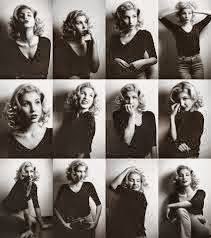
 I like how this image shows a sense of movement of the model as her position changes. I think by gathering a collection of photos and placing them in one big collage it helps to show different emotions or idea within one piece. Particular multiple imagery allows us to see different angles and some slightly different poses of which she takes. Allowing us to see a funny and serious side of the model. I think that by having this image in black and white is create a more sleek and provides a better feel for the image. 


Tuesday, 23 June 2015

Technique Page- Multiple Imagery

Multiple imagery can be create by using a variety of image which may or may not link. The steps below will show how the technique is created within photoshop.
  1. Take the desired amount of photo and upload them to photoshop (from 2, 3, 4, 9, 16 ect)
  2. Adjust and edit each photo as you wish then flatten each one.
  3. Create a new document size may vary depending on how many images you are using however 20 by 20 cm is often good if creating a multiple image with 9 images.
  4. Make all the photos which you are using to one size by adjusting the setting on the crop tool (this can be done by adjusting the number which would appear on the top left hand of the screen, as shown in the image below)

The number which are being used should be portional to find out what size to use you can go to adjust the size of the image click 'Image' at the top of the screen to resale a full down set of options chose 'image size'
This option will appear, change the width to 5 or 5.5 or a size of your choosing,( Ensure that is is set to cm and that the resolution is set to pixel/inch). Due to the re-sample option being on automatic it it will automatically adjust the height to size which is proportional. Then use these numbers for the width, height and resolution with the crop option shown above. Ensuring it is set on px/inch on the crop option which can be changed next to the resolution.
5. Put all the chosen images into the new document and move around to a way in which you like.
6. Save the image as a jpeg.

A multiple imagery with two images can be know as diptych and one with three images can be known as a triptych, these are created the same way as described above.

Work Diary- Slow Sync

How I created this images has been described within my technique page for slow sync. I like how it enable me to show two of each person, showing there movement. I like the blur shown which represent the time in between their movement. This technique helped to display the girls friendship. This was a brief shot which was an initial experiment to see how it work and gain greater knowledge of my camera ability. However it was a very interesting shoot which I enjoyed. 


Technique Page- Slow Sync

  1. A set up with a black background is required to produce effective photos. 
  2. The camera has to be on particular setting to carry out this technique.The camera must be set to a long shutter speed and has to be set to the "White Balance" option. 
  3. A 'redhead' light must be in use behind a polystyrene board due to the brightness of the light. 
  4. Set the camera to 'rear curtain sync'
  5. Take a light reading to ensure the light is balanced 
  6. Take the photography whilst Hold the camera still with the subject/ model moving.

Straight Images- Slow Sync